Monday 21 December 2009

LSS Christmas Tags


Well we are nearly there.................the big day. Are you ready??? I still have a little bit of wrapping left to do, so on that note I thought I would make some final Christmas tags for my LSS project this week. Lindsay has this fantastic kit....................Cards, Tags & Toppers. If you want some more inspiration on using this set then please also visit Lindsay's blog.

Talking of Christmas have you had snow?? We have for the last three days..............I must take some pictures to show you. It must be great for the children as they have now broken up from school. I have added my usual bling to these tags and some sparkly chipboard Christmas shapes.

Here is just a closer view for you. If you have run out of Christmas tag, then why not given these a go. They took me about 10 minutes to make in total from printing.
Sorry this is such a short post but I must go and I have Christmas jobs to do...............Take care and have a fantastic Christmas this year. Nettie.xx

Friday 18 December 2009

Polkadoodles DT Card - Week 31

Yippeee, my first Polkadoodle post!!! I have kicked off with an easel card and little old piggy here. The whole of this card was made using the Back to Nature CD rom, from Polkadoodles . Ohh sooo simple!! Seriously if you haven't got any of the Polkadoodles digital images then this is the CD to buy, there is so much crammed into this CD and I didn't know where to begin.
I started by making my easel card base, then just printed out all the images I needed for my card, simples................I have curved the fence to give it more dimension and added a few stick on beads. Really simple I promise.
Well this is the last challenge now for this year.................so why not take part. Check out the other DT's posts for more inspiration. Take care Nettie.x

Monday 14 December 2009

LSS Birthday Gift Box

Lindsays All Around Phrases Digital Stamp Set
Well, this week on Lindsays Stamp Stuff, it's packaging week. I love to make boxes and gift wrap items.................so I made this cute little box with a custom tag. I did steer away from Christmas and made a Birthday Gift Box complete with LSS tag using the All Around Phrases Digital Stamp Set. I have a couple of birthdays for family members around Christmas time, so I have somebody in mind for this one.
There are so many options with this digital stamp set, because it has so many sentiments wrapped into one and you don't have to just use them for tags. You could repeat them and use for gift wrapping, place a picture in the centre, change the colour of the text, add layers using decoupage effect...................and on and on. I have layered this Happy Birthday two layer sentiment onto some square burgandy card and then embellished with some handmade quilled flowers and glued pearls.
I made the box really quickly using some white card and then finished up with a box lid. Before gluing it together I stuck some My Minds Eye paper on all sides of the box and lid. Then I tied the box up with some wide organza ribbon and tied my tag to this.............ehh voila.Now if you have been looking at Lindsays digital images, then now is the time to pop on over to her store as she has a fantastic offer on. When you buy two sets from Lindsays Stamp Stuff, you get one free. If you purchase the two sets you want and then tell Lindsay which set you want for free in the comment box, she will send this to you after purchase has been made. This off is on until the 23rd December, so please don't miss it.
Also keep an eye out on Lindsay's personal blog, as she is giving away free Religious Christmas Stamp set today, which would be great if you haven't had time to do your quick Christmas makes.
Anyways that's it from meeeeee take care and wrap up warm. Nettie.xx

Monday 7 December 2009

Christmas Elf Box PFP & Some News

I'm baaaaaaaaaaack!! I thought I would try and sneak in with this one for the Passion for Promarkers challenge. Their challenge this week was to use any colours and produce anything but a card for Christmas and New Year. If I'm quiet they will never notice.
I was asked by a dear friend to make a gift box for a Crimbo pressie she had. She attends art classes and they were all taking part in..............you guessed it Secret Santa. They have a competition for the best dressed gift, so when she set me the challenge I of course accepted. Wendy (the friend) has quite a sense of humour and her gift is a miniature art set...........mini easel, mini paint tubes, mini canvases...........etc. The packaging was taking up a lot of room, so I broke it open and made some dividers for inside the box.
You may have noticed that I used this image before on one of my cards, but last time I coloured in red and green. The image is Pollycraft Cherry Kisses Elf and I love it. This time I went with blues, silver, green and white. I have used my usual amount of bling too. Sorry about the pics but the light wasn't great today.
Here is a little dimensional shot for you. Let's hope we win the best dressed secret santa!!
Now for the recipe................
Recipe:
Image: Pollycraft Cherry Kisses Elf
Snowflakes: Sizzix snowflake
Card & Paper: Forever Friends Christmas Papers & Bazzill Bling Blue, Metallic Card
Tools: Dovecraft embossing board, Promarkers, Fiskars Shape Cutter, Sizzix Tag, Corner Rounder, Nail file
Gems: Poundland Stick on Gems
Ribbon: From Stash

I wanted to share with you all my exciting news........................Nikky at PolkaDoodles has asked me to join the team of Polkadoodlettes and I'm thrilled that they think me worthy. I can't wait to start working with everybody and using their stash. They might regret asking me after a couple of weeks, as they don't know how nutty I am yet. LOL.
Anyways that's enough excitement for one day. Take care and thank you all for the lovely comments. Nettie.xx

LSS Christmas Cutlery Holder


Well, I'm continuing on with the Christmas table decorations. I don't think we will be able to fit the food on the table when Christmas day comes. No, that's a silly thing to say. Stuff the decorations bring on the food!!! If you haven't read my previous posts, then I will let you know that our colour scheme is Black and Silver. Here is my Christmas Cutlery Holder....... I have used two digital images from the Warm Winter Lindsay Stamp Stuff store. I have placed my usual bling on this make, with a sparkly bit of glitter on the medallion. This was a really quick make, so if you want to brighten up your dinner table then give these cutlery holders a go. I think the measurements are approx 13cm x 6cm, but they are really quick and easy to make.
Lindsay has a new Cards, Tags & Toppers Printable Kit in her store, just click on the link to go to her store. Next week in packaging, so keep your eyes peeled for some last minute decorating.
Well that's it from me. If your blog hopping then why not visit some of the other team members. You can find their blogs on my sidebar. Toodles for now. Nettie.xx

Thursday 3 December 2009

Digi-Stamp Tutorial

I'm a massive fan of Digi-Stamps, I love the way you can alter them to suit your needs. I didn't realise that there are some crafters out there that don't know how to use them, or how to copy and paste. One of those is my mum, so I sat down with her the other night to show her how I use them, resize them and print them. So I decided to put together a tutorial to show you how, now my intentions are not to teach you to such eggs but to help those of you who would like to know the basics........................so here goes......................

Open up your documents, pictures or hard-drive where your Digi-Stamps are stored. Double click on the folder you want to access
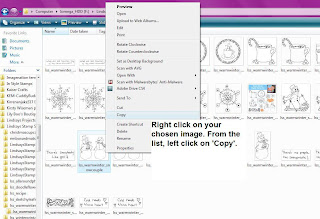
Find the image you want. Now sometimes you get two of the same images one is a JPG file and the other is a PNG file. When copying and pasting this way I use the JPG file. Right click your image and click on the 'Copy' command

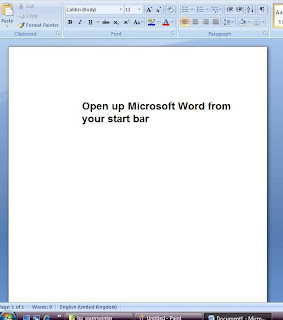
Going to your start bar on bottom left hand-side of your computer and open up Microsoft Word from your programs list

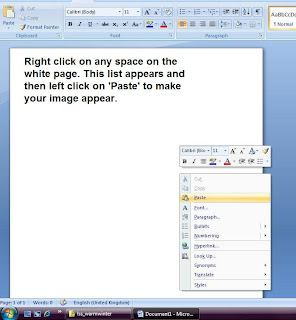
Staying in Word, right click on any white space and then click on the 'Paste' option. This will place your image onto the white page

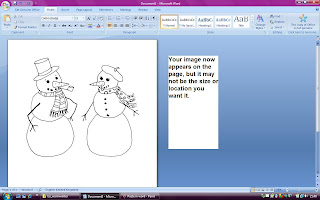
This has now placed your image in a random place and suize but you may not what your image in this place or this size. So you will now need to alter this, especially if you want to fit several images on one sheet of A4 paper or card
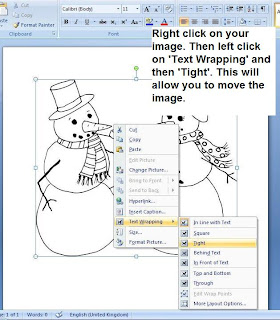
Now Right click on the image and hover over 'Text Wrapping' and a second list appears. Click on 'Tight'. This will allow you to move the image around the page and fit several images on one page
Now you just need to alter the size of your image. Again Right click on your image and click on 'Size'. This make the size command box pop up 
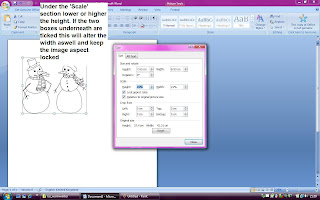
Under the 'Scale' section' click on the higher or lower arrow button to adjust the size of your image. As long as you have the two boxes underneath ticked it will alter the width size for you to match your height size. This will allow you to keep the true aspect of your image
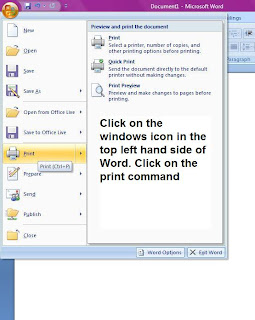
Now you all you need to do is print your image. Now you don't want to do this step yet if you want to put several images on one page. If you want to do this then just repeat the steps that you have just followed before printing. Now you are ready to print, click on the Windows icon at the top left hand-side, then click on the 'Print' option

The Print command box will now appear. Just click on 'Ok' to print out your images and you are finished..............ta da

I hope you have found this tutorial useful. Remember you can save the images on my blog if you want to or you can click them to view them in a magnified view. Take care Nettie.x

Wednesday 2 December 2009

Blogggy Award

My lovely bloggy friend (and DT fellow member) Karin, awarded me with this lovely blog award the other day. So thank you Karin, right back at you, mmmwwwwhhha. Now the terms of accepting this award are to answer the following questions with one word and then pass on to five other blogging buddies...........here goes....
  1. Your cell phone? Blackberry
  2. Your hair? Brown
  3. Your mother? Friend
  4. Your father? Irreplaceable
  5. Favourite food? Chinese
  6. Your dream last night? Forgotten
  7. Your favourite drink? Water
  8. Your dream/goal? Artist
  9. What room are you in? Lounge
  10. Your hobby? Passionate
  11. Your fear? Loneliness
  12. Where do you want to be in 6 years? Successful
  13. Where were you last night? Parents
  14. Something you aren't? Tall
  15. Muffins? Chocolate
  16. Wish list item? Car
  17. Where did you grow up? Kent
  18. Last thing you did? Spoke on the phone (sorry couldn't do that in one word)
  19. What are you wearing? Trackies
  20. Your TV? Big
  21. Your pets? Cats
  22. Friends? Cherished
  23. Your mood? Happy
  24. Missing someone? Lou
  25. Vehicle? Ford
  26. Something your not wearing? Make-up
  27. Your favourite store? Range
  28. Your favourite colour? Pink (Sorry so predictable)
  29. When was the last time you laughed? Yesterday (nephews are great)
  30. Last time you cried? Tonight
  31. Your best friend? Mum
  32. One place that you go to over and over? Supermarket
  33. Facebook? Occasionally
  34. Favourite place to eat? Cinnamon Spice

Now when it comes to passing on this award, I'm not too good at this. Only because I know some people don't like doing them. The only person that I would send it to is my mum, because she's always answering questions like these so here you go mum. But I would also like to give it to all my new DT friends and Lindsay of course, but please don't feel obliged to do this.

Thanks again Karin, I love your bloggy communications. Nettie.xx